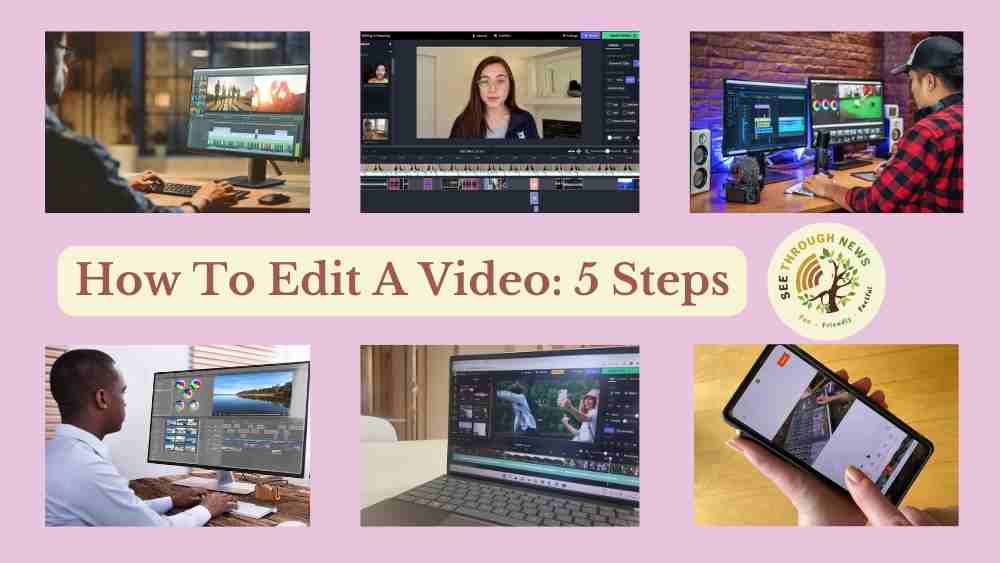
A basic video editing recipe that will never fail
- This article is part of a series of linked articles See Through News used to train its volunteer citizen journalists in how to create high quality video reports on zero budget.
- Our Global Reporter Intensive Training (GRIT) programme is designed for complete novices of all ages. Trainees require no more than a smartphone and internet access.
- GRIT is suitable for self-study or for use in groups, and like all See Through News resources are open source and free to use (but please acknowledge See Through News if you do).
Here’ our suggested sequence to read these GRIT articles:
- GRIT User’s Guide: an overview of the course and how you can use it
- How To Tell Video Stories: visual storytelling basics
- Free Carbon Drawdown Activisation Resources: some ideas to stimulate your ideas
- How To Plan A Video: for video, as for life, good preparation saves time and frustration
- How To Shoot A Video: 3 Rules: basics for acquiring good images and sound
- How To Edit A Video: 5 Steps: (this article) basics for clear visual storytelling
Editing – storytelling from the shadows
Think of making TV news or Hollywood movies, and we tend to think of crews in the field, or huge film sets.
The most creative parts of storytelling, however, are the least showy. They tend to happen hunched in front of screens, often alone, in edit suites or these day, on laptops. No wonder we don’t think of writing or editing when we think of storytelling.
The editing process happens largely inside peoples’ heads, on paper or in darkened rooms. Not much to see there, better wait until we can see the final result.
Editing as Cooking
Time then, to grab Editors from the backstage shadows, haul them on stage, and place them, blinking, in the spotlight.
Or rather, let’s leave the theatre and go to a restaurant, as cooking a meal provides an even better metaphor for the critical role editing plays in making a video.
If we imagine preparing a dinner, most of us don’t think of an elaborate written meal plan (i.e. the video planning). Nor do we think of planting seeds and hunting/breeding animals (pre-production) or harvesting/foraging plants or slaughtering animals and butchering meat (shooting).
We tend of imagine being in the kitchen, with the meal already planned and the raw ingredients laid out in front of us.
Editing is doing the cooking.
Entire cookery shows are based on the premise that different chefs will produce very different meals from the same ingredients – that’s a useful way to think about editing. There are no Right or Wrong ways to edit any given story, but you’ll tend to get better results if you stick to certain established rules.
Story planning – what happens before you pick up a camera, and the least glamorous part of the creative process – we address in another article. Filming – all the harvesting and hunting – is covered in articles about shooting interviews and sequences.
This article is about what happens between putting the camera away, and finishing your video.
In the documentary and film trade, this is known as ‘post-production‘ often abbreviated to ‘post’. As in the dangerous, common phrase,’ Let’s not worry about that now, they can fix it in post‘ (whenever you hear this, stop and think how you can fix it now. It’s always much cheaper, and will save time in the long run).
‘Post’ can embrace lots of bells and whistles, but this article focuses on the most fundamental storytelling element of all. The Edit.
We’ve condensed the Basics down to 5 Steps, which can be followed using free software on basic smartphones. Starting simple, with limited options, is a good place to start. It focuses you on unchanging fundamentals, without the distraction of lots of fancy gear or the paralysis of too much choice.
There’s a lot of amazing free software out there, and advances in technology mean what used to cost a million dollars to do a decade ago can now be done, often more reliably and with better technical quality, on an $80 smartphone.
With free software and a 5-year-old computer, you can make a feature movie to cinema specs. But there’s nothing like stripping things down to learn the basics, so read this 5-step recipe before grabbing your smartphone.
Storytelling Basics – content, preparation and sequence
Returning to our cooking metaphor, consider a recipe. All recipes consist of three key elements:
- a list of ingredients
- how to prepare the ingredients
- the order in which to combine them
For example, say our meal plan (think video plan) was a simple mushroom and onion omelette, our recipe would look something like:
- Get an egg, some mushrooms and an onion
- Crack and mix the egg, wash/trim/slice the mushrooms, chop the onion
- Fry the onion, then add the mushrooms, finally add the egg
Result: a satisfactory mushroom & onion omelette. Some cooks will make more delicious ones than others, but they’ll all be perfectly edible. But what if:
- You start without all the ingredients: no chef can produce a mushroom and onion omelette, without the 3 basic ingredients – no onion, and you can still make a delicious mushroom omelette, but that’s different.
- You don’t prepare the ingredients properly: forget to crack the egg, throw the wrong bits of the mushroom away, leave the skin on the onion, and you may still produce something, but it won’t be very tasty.
- You follow the wrong sequence: start with the egg, fry it for 3 hours, then throw in the onion and mushrooms just before serving – yes, technically you could argue you’ve made a mushroom & onion omelette, but you won’t get many repeat customers.
Editing is exactly the same. Rules, like eggs, are meant to be broken, but there’s a reason why we have them. Come up with a good plan, acquire good ingredients, prepare them well, and process them in the right order, and you won’t go far wrong.
Ingredient List
All videos, from social media memes to Hollywood epics, are composed of the same basics elements, all of which fall into the two categories of Sound and Pictures (‘audio-visual’ – the clue’s in the name!).
Some editors start with Pictures, and then think about Sound. Others start with Sound, and then consider Pictures. Either is fine, you’ll find what suits you best.
Here are the main types of ingredients for Sound and Pictures:
Sound Elements
- NATSOT=’natural sound on tape’.
- V/O = voiceover, AKA narration. Recording of the storyteller/reporter reading the script.
- Actuality. Anything that was recorded ‘in the field’. This can be anything from a reporter’s piece to camera (see below), to a snatch of conversation or birdsong you recorded when filming.
- Sound Bite, AKA interview clip. A snippet of an interview. This could be a ‘talking head’ (i.e. expert) interview, a voxpop (see below), the character(s) featured in your video, or anything in between.
- Music: a minefield for copyright, but music is a powerful addition to direct the viewer’s mood, and signal the storyteller’s intention.
- FX AKA sound effects. Any additional sound effects that are not Actuality, i.e. recorded yourself. These could be stock effects from a library, or specially created ‘Foley’ noises.
Picture Elements
- GV =’general views’, AKA ‘beauty shots’. These are ‘scene-setting’ shots that give you an immediate sense of time and place, and evoke a particular mood. They immediately inform the viewer what the video is ‘about’.
- PTC = piece to camera, AKA ‘stand-upper’. The reporter or presenter talking to the viewer on camera. Used to establish the identity, and authority, of the storyteller.
- B-Roll. Introductory footage. Can look like GVs, but B-roll has a more specific purpose. The images match what’s being said at the time, whether in narration or sound bite.
- Voxpop, AKA ‘person on the street interview. A staple of news reports and documentaries. Ordinary people expressing their views in their own words. Appears scientific, but almost never is (see The See Through News Vox Pox Project for more on how easily Voxpops can be manipulated).
- Interview. Any other type of interview, from a formal ‘sit-down’, to a casual chat with a farmer in a field, or a bus driver at the wheel.
- Still. A still image from ‘real life’, e.g. photograph
- Graphic. A image you’ve created to illustrate your story. Could be static or animated.
- Caption. Any text on screen, e.g. identifying interviewees or locations, subtitles, Titles, closing credits etc.
Now your have your list of ingredients, you need the instructions of what to do with them. You’ll need a script.
Script Drafts: Shooting Script, Assembly, Rough Cut, Fine Cut, Final Cut
Here’s the GRIT script template we introduced in How To Plan A Video.
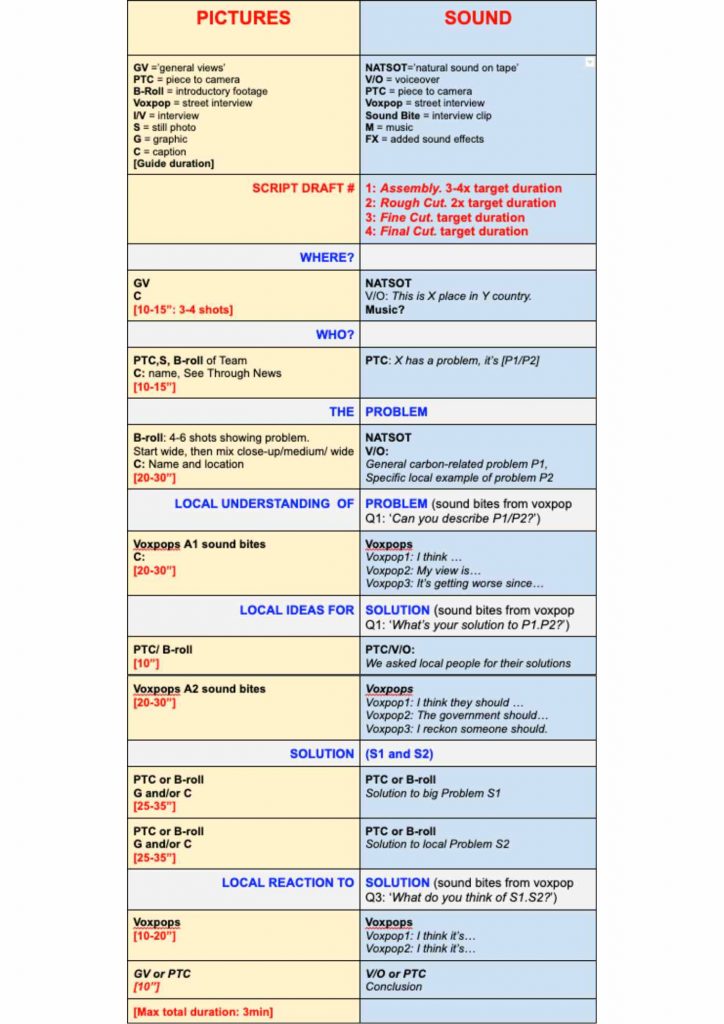
You now know in detail what all the terms describes in the Key below the Picture and Sound column headings mean. What about the next line, in red, describing the Script draft number and type?
There are four basic stages to any script development. If you’re an experienced crew making a short video for a tight deadline, you may not always need to write down every single stage, but all bigger and more complex productions will use these four stages as a minimum, often many many more.
This is because each is a critical production milestone in the development of your story, and its transformation from a static, text-based Treatment (see How To Plan a Video) to a dynamic, linear story told in a video. These key stages are:
Assembly
This is your first effort. It usually involves pruning out all the unusable bits, and placing them in some sequence – chronological is a logical starting point – on your timeline. The Assembly should significantly reduce the volume of video from your raw material, but may still be multiples of your final target duration. It’s a starting point to start whittling down to…
Rough Cut
In a Rough Cut script, your story is starting to take shape. A rough cut should be no more than twice the target duration of your final film. Now you can start whittling it down to…
Fine Cut
A Fine Cut is the exact target duration. Your timeline can still change images, and swap chunks of the timeline around, as you seek the best way to tell your story, but for every shot you cut, you need to replace (unless you don’t have a minimum duration), and for every shot you add, you need to cut the same duration.
Final Cut
This is your final script. There are different sub-categories (e.g. ‘Picture Lock’ means you can change the sound, change the words, and polish the images, but the images and their sequence are fixed) but the Final Cut script, as the name suggests, describes what your audience will end up seeing an hearing on screen.
So how do you get from Shooting Script to Final Cut Script?
Editing: 5 Step Recipe
Here’s the basic editing recipe. Like all rules, you can break them, but only once you know them. Following this procedure will always be an efficient way to create a coherent, engaging video.
- Install an editing platform. This is your kitchen. There are loads of free video editing apps. Currently, we recommend Youcut for Android smartphones and iMovie for iPhones. These can also be used for Windows/Mac tablets/laptops/desktop computers. We also suggest HitFilm Express for the latter. Familiarise yourself with the software by trial and error and watching YouTube video tutorials.
- Acquire ALL available media – video, audio, graphics: These are your ingredients. If you don’t have them uploaded to your device and available in the right format, they may as well not exist. View all your media in real time, ideally twice. Disciplined chefs in well-managed kitchens tend to produce good meals, so make notes, label clips so you can find them quickly, be consistent.
- Pick and order your Best Ear Bits: Now you’re preparing your ingredients. Trim the best bits of interview, without worrying about about how they look. We’re looking for Ear Bits (AKA ‘sound bites’) not Eye Bits (AKA ‘beauty shots’). Place your favourite sound bite at the start, put your second-favourite at the end, and arrange the others in between to build your best story narrative. If you think important parts of the story are missing, create graphics or record voiceover to fill the gaps. This is your first draft, or in the trade lingo, your ‘assembly’.
- Review, test, repeat: Do taste tests on yourself and, when you’re ready, other people. Have a breather before taking another look at your assembly. Tweak it. Now show it to friends and strangers, telling them as little about what you think the story is as possible. Resist your urge to explain what you meant, Instead, thank them for being so helpful, and take careful note of their responses. What’s missing? Have they spotted something you missed? How can you clarify what you meant to tell them?
- Trim, Tweak and Garnish: Keep adapting, testing, adjusting your dish until everyone finds it palatable, even delicious. If you think you story needs them, add other ingredients like graphics, captions, titles music and sound effects. Repeat until either you’re happy, or your deadline arrives, whichever comes first.
Congratulations, chef. You just made your first video.
There’s more, of course
Of course there’s much more to it than this. The bigger the dish, the greater the number of ingredients, the more complex the flavours, the more complicated the process. We have another article for more advanced editing.
Plus, of course, the really important part is the quality of your original idea (or the story you end up telling, if you stumble across a better one en route).
You can tell a story really well, but if no one else finds the content of your story compelling, entertaining or interesting, you’ve rather wasted your time. You might enjoy a chocolate and vinegar omelette, but don’t expect to open a chain of fast food joints if that’s all you serve.
Still, follow these 5 steps and you’ll make a watchable video. If you don’t, you’re unlikely to make a good video.
All TV news crews, Hollywood directors, documentary filmmakers and advertisers follow these basic steps, so it’s good to get into good habits from the start.
As with everything, practice makes perfect. Think about what you do before you do it, but don’t think too long or too hard. Much better to try, learn from your mistakes, fail better next time, and keep persisting.
The more videos you make, the fewer mistakes you’ll make, and the better your judgement and execution will become.
Good luck, and get editing!